

The ultimate guide to guerilla-style bodybuilding is right at your disposal – here, we are going to talk about how to do dips at home if you’re lacking the proper equipment and or/space.
Before we delve into the meaty stuff, let’s figure out why dips are great and how exactly they can contribute to your great body shape.
What Are Dips?
Dips are a strength-training exercise, which involves your body moving vertically up and down using a dip bar or bench. It targets primarily your triceps, pectorals, and deltoids
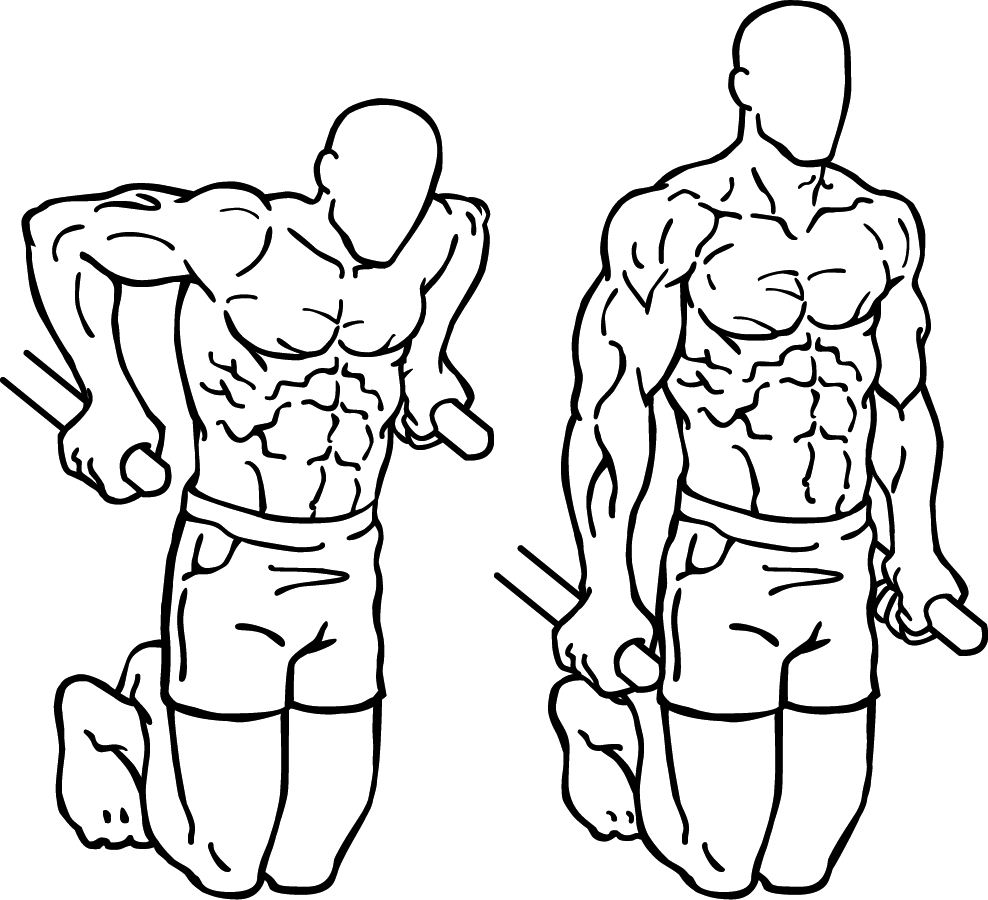
Although it may seem like an easy exercise to some, dips are no easier than pull-ups. In order to perform 15 to 20 reps of dips in a few sets, you need to have some preliminary training experience and have your triceps, pecs, and deltoids built up a little.
As an exercise, which uses your own body weight, dips have quite a few variations. Depending on the grip width, you can shift the focus from triceps (shoulder width grip or narrower) to pectorals (wide grip) and vice versa.
Why Dips Are Cool
Dips are one of the few exercises that involve an almost full range of motion – as compared to regular bench presses or triceps curls. Larger motion range = more muscle stress = better workout = better muscle gain.
Isn’t that what we all crave after all?
You should do dips if:
- You want to develop your triceps and pectorals
- You want to achieve more separation in these muscle groups
You shouldn’t do dips (or, at least, do them with great care) if:
- You’ve had a shoulder injury (in this case, consult with your doctor before considering dips)
- You’re fresh to bodybuilding and still haven’t built any muscle yet (in this case, start with assisted dips – see below)
Various Kinds of Dips
Dips come in various forms and sizes but, generally, there are three kinds of dips.
Assisted Dips
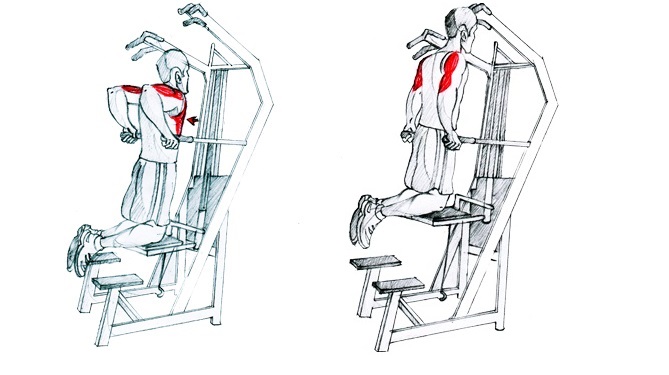
This is something that would be very useful for a beginning athlete. Assisted dips are done on a special dip/pull-up machine usually found in most gyms.
It’s a huge machine with pull-up bars on top and dip bars in the middle. To make it easy for you, there’s also a weight-adjustable platform below, which helps you perform the exercise by counterbalancing your weight.
Assisted dips are fine when you’re just starting to do strength-training exercises but they’re nowhere near that effective as other kinds of dips.
Plus, they require quite a sophisticated and expensive piece of equipment (dip machine), which renders assisted dips useless if you want to figure out how to do dips at home.
Bench Dips

Now, this is where it gets real! Chances are you’ve seen people doing this exercise a lot in the gym or elsewhere (in the movies or clips).
In fact, this is a very good exercise, which targets your triceps (primarily) and may serve as a nice addition to your arms superset.
And, most importantly, you can do it at home (we’ll get to that in just a few paragraphs).
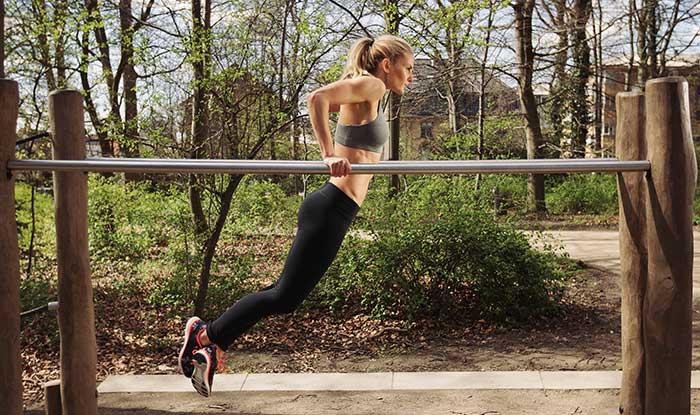
True Dips
True dips are called that for a reason. They’re the toughest kind of dips and require some physical strength to perform correctly.
For true dips, you will need a dip bar (stationary or movable). Depending on the grip width, your main focus will change from pecs (wide grip) to triceps (narrow grip).
This is the kind of dips you can also do at home, with a little investment into a dip bar.
See also: The Good Alternatives To Dips
How To Do Dips At Home
There are a few ways you can do dips at home – we split them into two main groups:
- Free (without spending a single dollar)
- Affordable (require investing a little money)
Doing Dips At Home For Free
1. Using A Chair/Stool
Alright, you may not have a home gym but don’t tell us you don’t have a spare chair or stool. This should be more than enough to do dips at home with very few compromises to the quality of the workout.
Here’s what you have to do before getting ready to do an exercise:
- Find a chair or a stool (the taller, the better)
- Make sure it’s sturdy enough to hold on its own
- Put the chair against the wall or another immovable object (bed, wardrobe)
- Ensure 5 to 7 feet (1.5 to 2 m) of free space for your legs
- See that the chair is secured (it’s not moving to the side)
- Do a few test dips to see if you’re comfortable
Once you’re ready to do the exercise, simply perform these steps:
- Place your hands on the chair/stool seat with palms facing inwards
- Tuck up your legs so that your knees form a 90-degree angle
- Straighten your back
- Lower yourself until your elbows are parallel to your shoulders
- Raise yourself into the original position
- Do 40 to 45 reps in 3 sets
Here’s a video to show you the detailed technique of chair/stool dips.
Pros:
- Universally affordable
- Requires nothing but your will to exercise
- Allows to do workouts at any time and day
Cons:
- Not really adjustable
- Hardly comfortable
Final Thoughts
Chair dips are as primitive as you can get without compromising the workout quality. Although we wouldn’t consider them the best kind of dips you can do, chair dips are still quite effective if done properly.
2. Using Free Playground Equipment
If you’re living near an apartment complex with a playground, you’re all set. If there’s a public playground nearby, chances are will be doing fine too.
What, if there’s nothing like that around your place? Search for the nearest school or university – there should probably be some kind of playground.
Most of these playgrounds feature parallel bars, which is exactly what you need. Once you located a pair of parallel bars that are approximately of your shoulder width, grab them and start doing dips by lowering and raising your body.
This kind of street workout can prove quite effective – especially if done in a set with other similar style exercises like pull-ups or chin-ups.
In fact, this might as well be one of the oldest workouts known to mankind.
Pros:
- Free dip bars at your disposal
- Natural and effective type of workout
Cons:
- Not always easy to access
- Not too great on a rainy or cold day
Final Thoughts
Despite being a natural kind of exercise, street dip bars still have their flaws. The major one is that it sucks sometimes to get out there in the rain and do your thing.
However, it’s free of charge and gives you a chance to breathe fresh air and gain some strength at the same time. Just make this isn’t private property you’re doing your workout on.
Read more: What Muscles Do Dips Work?
Doing Dips At Home – The Affordable Way
1. Bench Dips
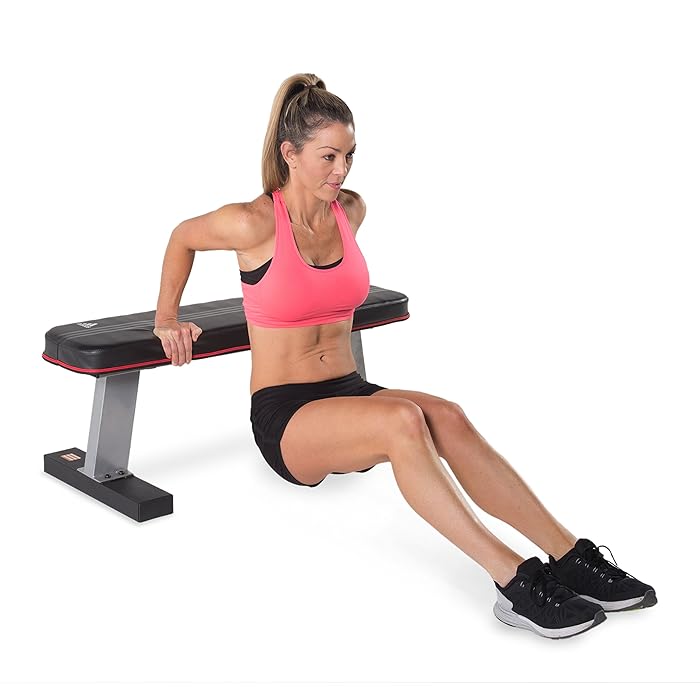
Well, first of all, you are going to need an exercise bench, and this is where it gets some spending involved. Not that much, though.
Chances are some of you have already got a bench at home. Any kind of bench will do, really, as long as it can be made flat.
If you don’t have a bench, there’s a good chance you can get one for not more than hundreds dollar (just the bench, no weights). Most local sports equipment stores have them in stock, as well as online stores.
The technique is pretty much the same as with the chair dips, although you will find it much more comfortable to do dips on a bench.
- Place your hands firmly on the bench surface
- Lift your butt off the bench and tuck your legs up so there’s a 90-degree angle in your knees
- Straighten your back
- Lower your body till your elbows are on the same level as your shoulders
- Raise your body into the original position
Do 10 to 15 reps in 3 or 4 sets to achieve maximum effect.
If you’re looking for some tougher workout options, the exercise bench is where you can have them.
To make life more difficult for yourself, you should get a similar chair, stool, or another bench, which is a little bit higher than the original bench. Put your straightened legs on its – all the rest is the same (see the picture below).

With just a little money thrown in, your exercise options have greatly increased in their variety and effectiveness.
Pros:
- Quite affordable
- Provides for a better quality workout
- Increases your exercise options
Cons:
- Requires more space (including storage)
- Does not allow true dips
Final Thoughts
An exercise bench can greatly increase your chances for massive triceps and well-developed pecs and shoulders. It doesn’t cost that much and gives you a nice variety of exercise options.
However, it still won’t allow you to do true dips and probably will require some space to use and store it.
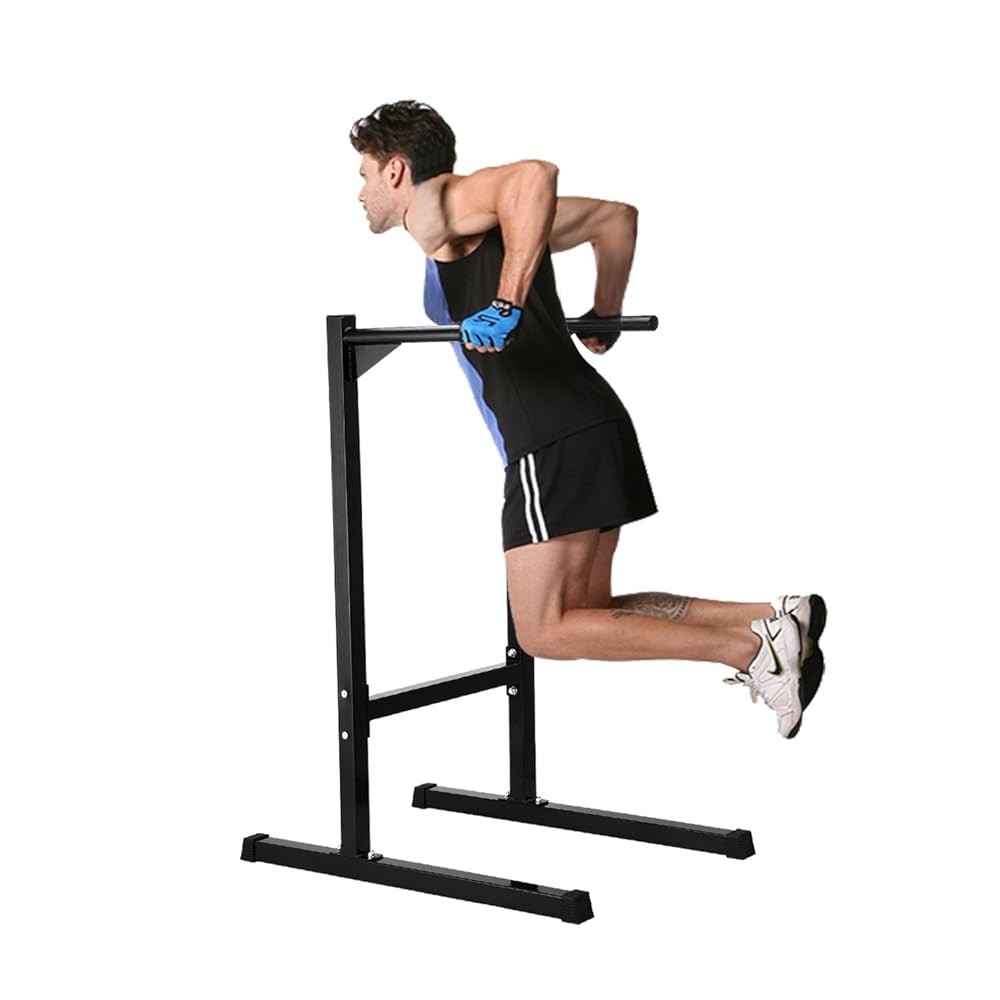
2. Dip Bar/Dip Station
Believe it or not, a dip station or good homemade dip station might be the single most important piece of sports equipment you’ll ever own. Why do we think that?
Firstly, it allows you to do the three basic strength training exercises – pull-ups, dips, and leg raises, thus developing your main muscle groups (chest, arms, shoulders, and abs). Legs and back are kind of left out because they are not really involved but the upper body is all there.
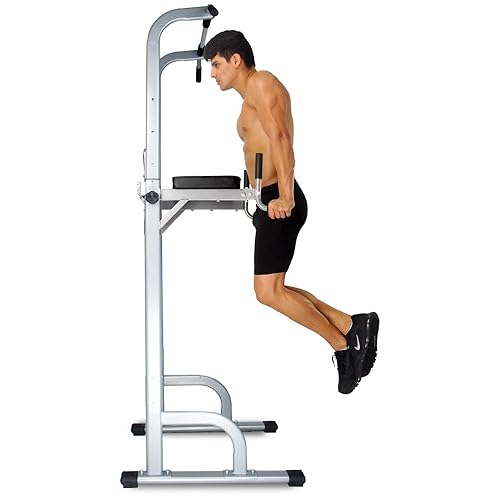
Secondly, allows for great variety and weight progression – if you feel strong enough to do 15 reps in three sets, attach a barbell to your waist (using a special chain) and you’ll feel the challenge the back there again.
Finally, it’s quite compact and relatively affordable. In fact, you can easily get a decent pull-up/dip station for under $200.
Compare with the monthly membership price at your local gym and you will get the idea.
However, if you’re tight on the budget at the moment and still want a solution for your dipping needs, you might go with a basic dip bar, stripped of any additional features but still enough to do dips.
These things are usually anywhere from $60 to $100. They’re portable, lightweight (as compared to pull-up/dip bars), and space-efficient. And they’re still capable of providing a basic workout.
Having considered all this, we have kind of forgotten about the main advantage of dip bars in the first place. They allow us to do true dips.
What’s the difference a between a true dip and a bench/chair/stool dip?
True dips mean that we can stretch our arms (and, therefore, muscles) to the maximum extent by lowering our body below the shoulder-elbow line, unlike in bench dips where you can’t go lower than the ground.
This provides for a more exhausting workout and gives us a perfect chance to push the limits of our muscle development.
Pros:
- Great variety of exercises
- Allows to do true dips
Cons:
- Quite costly
Final Thoughts
Although it’s the most expensive option on the list, it’s by far the most versatile and effective in terms of exercise options and workout in general.
Conclusion
Now you know how to do dips at home without breaking your bank. All of the workout options listed here are good enough for you to use.
Choose the one that suits your needs best. We hope you enjoyed it.
Related Posts
 7 Ways To Save Big On Fitness Gear and Supplements
- 29 High Protein Salad Recipes
- 10 Best Exercises To Relieve Sciatica Pain
- 21 Exercises That Start With R
- Walking For Weight Loss 101
- What Exercises To Do Before Playing Polo: Prepare Like a Pro
- 54 Healthy Meal Prep Recipes
- Creatine Not Dissolving? (and How To Fix)


